Built in
Remove background noise with the Audio inspector
Select the clip
Timeline > ClipPick the audio clip, or a video clip with audio, in the timeline. On a dual mono clip, select one audio component: the enhancements work per component.
Open the Audio inspector
Inspector > Audio > Audio EnhancementsCommand4Open the inspector and click Audio at the top. The Audio Enhancements section is where every built-in fix lives.
Try Enhance Audio
Modify > Enhance AudioOptionCommandAFinal Cut Pro analyzes the clip and fixes what it finds. A green check next to an enhancement means it was analyzed and adjusted if needed.
Turn up Noise Removal
Audio Enhancements > Noise Removal > AmountSelect the Noise Removal checkbox and drag Amount. Stop as soon as the voice starts to sound thin or watery.
Add Voice Isolation
Audio Enhancements > Voice Isolation > AmountFor noise that sits behind the words, select Voice Isolation and drag its Amount. Use it on one component at a time.
Listening guidance, not an Apple figure · Setting Amount in steps 04 and 05
- Play a noise-only gap, then a spoken phrase with soft consonants like s, f and th.
- Switch the enhancement off and on at similar loudness and compare.
- If consonants disappear or the voice turns watery, lower Amount or turn it off. Don't jump to 100%.
Hidden controls, Enhance Audio's checks and the other two enhancements
If the enhancement controls aren't showing, point at the right side of the Audio Analysis bar and click Show. After Enhance Audio, a green check means an enhancement was analyzed and, if needed, adjusted; a blue checkbox means it's on. The import option "Analyze Audio: Fix audio problems" fixes only severe problems, and moderate ones show in yellow next to Audio Analysis until you run Enhance Audio.
The same section has Equalization (presets, or Controls for manual changes) and Loudness (Amount for compression, Uniformity for the dynamic range it affects). Neither removes noise. Equalization and Voice Isolation are the two you always turn on by hand.
Pick one
Which control for which noise
Audio inspector
Noise Removal
Steady noise: fans, air conditioning, hiss
- Amount
“Reduces background noise.”
Audio inspector
Voice Isolation
Noise behind the voice
- Amount
“Prioritizes human voices over other parts of the audio signal.”
Audio inspector
Hum Removal
Mains hum and buzz
Select Hum Removal, then choose 50 Hz or 60 Hz for the mains power where you recorded.
- 50 Hz
- 60 Hz
“Reduces common electrical hum noise at either 50 or 60 Hz.”
Effects browser
Denoiser
Low hiss you want to tune by hand
- Threshold
- Reduce
- Noise Type
- Smoothing
“Eliminates or reduces any noise below a threshold volume level.”
Quotes are Apple's descriptions from the Final Cut Pro User Guide. You can stack them: Hum Removal and Noise Removal on the same clip is normal.
By hand
Tune hiss by hand with the Denoiser effect
Add Denoiser to the clip
Effects browser > DenoiserCommand5Open the Effects browser, search for Denoiser and drag it onto the clip, or double-click it with the clip selected.
Set Threshold on a noise-only gap
Audio inspector > Effects > Denoiser > ThresholdFind a moment with no speech and set Threshold so only the noise sits at or below it.
Raise Reduce while it plays
Denoiser > ReduceTurn Reduce up until the noise drops but little of the voice goes with it.
Smooth out artifacts
Denoiser > SmoothingIf you hear chirps or "glass noise", raise the Smoothing knobs: Frequency, Time and Transition.
Simplified illustration: one frequency band
Where Denoiser lives and what each knob does
Apple lists Denoiser under its Legacy effects, the Logic effects that ship with Final Cut Pro. It uses FFT analysis to find frequency bands that are quieter and less complex than the voice, and turns them down. Each 6 dB of reduction halves the volume. Frequency smoothing changes neighboring frequencies as well, Time sets how fast it reaches full reduction and Transition changes neighboring levels; the first and last are there to stop "glass noise". Apple's warning, in its words: pushed too hard, "the algorithm produces artifacts", which are "usually less desirable than the existing noise".
Heavy noise
When the built-in tools aren't enough
If the native cleanup still sounds poor, or pushing Noise Removal or Denoiser harder brings the artifacts Apple warns about, these are the clips where a speech model may do more:
Wind on the camera mic
Gusts that land on top of the words.Traffic or a crowd as loud as the voice
Noise that changes every second.Echo and reverb
Audio Enhancements has no control for it.Clipped, distorted speech
Diffio repairs some clipping in the same pass.
Wind and traffic on real videos, restored
Diffio 4.7, November 3, 2026, same loudness. These show what Diffio does; they are not a controlled comparison with Final Cut Pro.
Outdoor interview, California
Press play, then switch between Original, 4.7 Flash and 4.7 Pro. The picture and your place stay the same.
Read what's said
“So rodenticides are very effective at killing rodents, but it doesn't just stop there. What eats the rodent and eats that animal and so on and so forth up the food chain can also be affected. Things like birds of prey and wild cats, coyotes can be affected by rodenticides.”
Source: Lena Chang, a U.S. Fish and Wildlife Service biologist, outside the Ventura Fish and Wildlife Office in March 2018, with wind gusting across the camera mic. Video by Ashley Spratt, USFWS, public domain.
Source & method
Restored November 3, 2026 with Diffio 4.7 Flash and Diffio 4.7 Pro; the Flash soundtrack is the same excerpt from our speech enhancer test. Every version plays at matched loudness. Source and license.
Round trip
Final Cut Pro to Diffio and back, in sync
Export from Final Cut Pro
File > Share > Export FileCommandESelect the clip in the browser, or a range in the timeline, and export it as Video and Audio or Audio Only.
Upload it to Diffio
Diffio > New projectMOV or MP4 video, or WAV, M4A or AAC audio (not AIFF), up to 90 minutes and 2 GB. Choose Diffio 4.7 Flash or Pro.
Download the restored speech
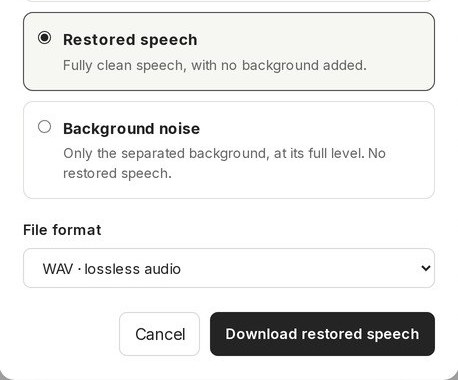
Download > Restored speech > WAVCompare it with the original, then download Restored speech as WAV (paid plans). The Background noise track downloads on its own.
Import it
File > Import > MediaCommandIBring the WAV into the same event as the original clip.
Sync it to the picture
Clip > Synchronize ClipsOptionCommandGSelect the original clip and the WAV in the browser and synchronize them. Final Cut Pro lines them up by their audio.
- Use audio for synchronization
- Disable audio components on AV clips

Where are you starting from?
Source clip
You haven't cut it yet: this branch uses Synchronize Clips
- Export the whole clip from the browser.
- Import the WAV and select it with the original clip.
- Clip › Synchronize Clips, with Disable audio components on AV clips selected.
Edited range
It's already on your timeline: this branch connects the WAV by hand
- Mark the range with I and O, and write down the timecode where it starts.
- Export the range, restore it and import the WAV.
- Select the imported WAV in the browser, put the playhead on that start timecode and choose Edit › Connect to Primary Storyline (Q).
- With the skimmer on, Q connects at the skimmer instead, so turn skimming off or keep the pointer off the timeline. Then turn the original audio down.
- Check the first and last word Play the first word and the last with the original audio turned down. If the lips match at both ends, it's in sync.
- If Synchronize Clips misses With no sync point found, Final Cut Pro lines the clips up at their starts. If that's wrong, connect the WAV by hand and drag it until its first word lines up with the original's waveform, then check the last word again.
Other ways back in: the MP4 and the background track
Not edited yet? Download the MP4 instead. It's the same picture with the restored speech as its audio, so you import it and cut from it with nothing to sync. Want some room tone back? Download the Background noise track too, connect it under the speech and set its level in the timeline; Diffio keeps what it removes as its own track. Use the Optimized/Original view setting before you export from a proxy project.
Questions
Questions about noise in Final Cut Pro
How do I remove background noise in Final Cut Pro?
Select the clip in the timeline, open the inspector (Command-4) and click Audio. In Audio Enhancements, select Noise Removal and drag its Amount slider. For noise behind the voice, also select Voice Isolation and drag its Amount. Modify > Enhance Audio (Option-Command-A) does a first pass for you.
Does Final Cut Pro have noise reduction?
Yes, for audio and for video. The audio tools are Noise Removal, Voice Isolation and Hum Removal in the Audio inspector, plus the Denoiser effect in the Effects browser. The Noise Reduction effect in the Video effects is for grain in the picture; Apple covers it in Reduce video noise.
What is the difference between Noise Removal and Voice Isolation?
Apple describes Noise Removal as reducing background noise and Voice Isolation as prioritizing human voices over the rest of the signal. Noise Removal is the one to try first on steady noise. Voice Isolation is for noise that changes and sits behind the words. Both have one Amount slider, and you can use them together.
Why is noise reduction taking so long in Final Cut Pro?
If it's the video Noise Reduction effect, Final Cut Pro analyzes the clip for noise the first time you apply it, and you don't see the result until the analysis finishes. Apple also says to put it first in the clip's effects list for the best performance. That effect works on grain, not on the sound.
6 more questions
Why does my audio sound garbled or watery after noise removal?
Too much reduction. Apple warns that Voice Isolation on several audio components playing at the same time may sound garbled, so turn it off on some of them. Denoiser pushed too far makes artifacts that Apple calls usually worse than the noise; lower Reduce or raise the Smoothing knobs. On Noise Removal, back the Amount off.
I don't see Voice Isolation. Which version do I need?
Update Final Cut Pro. Apple's release notes for version 10.6.2 (April 12, 2022) added "Improve the clarity of speech by adjusting the level of background noise using machine learning", which needs macOS Monterey 12.3 or later. If the controls are hidden, point at the right side of the Audio Analysis bar and click Show.
How do I remove hum in Final Cut Pro?
Select Hum Removal in the Audio inspector and choose 60 Hz or 50 Hz. Pick the frequency of the mains power where you recorded: 60 Hz in the United States, 50 Hz in most of Europe.
Can Final Cut Pro remove echo or reverb?
The Audio Enhancements section has no echo or reverb control: it offers Equalization, Voice Isolation, Loudness, Noise Removal and Hum Removal. Voice Isolation can bring the voice forward. For a voice that sounds far away in a hard room, a speech restoration tool like Diffio does more; see removing echo.
Is there a Diffio plugin for Final Cut Pro?
No. Diffio is a web app and an API, so you export from Final Cut Pro, restore the file in Diffio and import the result. The restored speech runs the full length of the file you uploaded, so it syncs back to the clip it came from.
Is Diffio free to try with a Final Cut Pro export?
Yes. The Free plan includes 3 uploads, audio or video, with a 2-minute preview of each result on Diffio 4.7 Flash. Downloads, full playback and Diffio 4.7 Pro start with Basic at $8 per month. See plans and limits.